It’s time for Ann Russell to alert her guests to the impending nuptials. In the third part of her planning diary she sends out save the dates

We recently celebrated a pre-wedding milestone. With a year until our big day came the reminder that time was passing more quickly than expected. A long engagement (dictated by the availability of our venue) meant our planning journey to date has been perfectly relaxed. It wasn’t until we booked our photographer, Andi Watson, and he advised us about looming deadlines that we made a comprehensive to-do list.
Topping our list were save the date cards and after some tentative queries from guests, we decided this was the best way to share our plans. Although save the dates aren’t essential, they’re a great way to announce your engagement and will help you finalise that all-important guest list before sending out the official invitations. If you’re feeling creative, it’s definitely worth making cards of your own. Like all good things, DIY stationery takes a little patience but is worth every effort for a complete sense of self-made satisfaction.
GIVE ADVANCE NOTICE
You’ve set the date and now it’s time to share the news. Hurray! It’s true what they say, save the dates aren’t compulsory but they’re particularly useful if you’re planning a destination wedding. By sending a save the date you’re giving guests time to take advantage of travel deals and cheap flights. Let’s face it, everyone loves a bargain and no one wants their wedding to become a financial burden for their guests.
We’re planning an August wedding near Edinburgh so we thought it sensible to share our plans sooner rather than later to allow our guests time to organise travel plans in advance. If you’ve visited the Scottish capital in August, you’ll know all about the influx of festival tourists and the distinct lack of accommodation as a result. Similarly if your wedding day coincides with a major public holiday like Easter, Christmas or New Year’s Eve, it’s worth keeping guests in the loop to ensure they don’t inadvertently book a weekend away.
THINGS TO INCLUDE
So you’ve decided to send a save the date. What details should you include? Both your first and last names are essential – it sounds obvious but your guests might know couples with similar names which could cause confusion. If you’re getting married somewhere unusual it’s worthwhile including the venue address too so guests can figure out travel logistics. The date itself should feature very prominently on the card to ensure it’s not missed. As an optional extra you could include a link to your personalised wedding website where guests can find everything they need to know about your special day.
FOLLOW TRADITION
Wedding etiquette can be old fashioned but there’s one essential save the date rule you need to follow to ensure guest list harmony. Only send cards to friends and family that will receive a subsequent wedding invitation. Giving save the dates to people outwith your guest list is likely to cause offence and merely highlight that they’re not invited. Be sure to address your save the date card or envelope with the specific names of the people you’re inviting. For example a husband and wife invite should list only the couple’s names rather than ‘The Smith Family’ which implies their children are invited too. Addressing guests properly at this stage means you’ll avoid awkward questions later on.
EMAIL v SNAIL MAIL
You might spend half your week online reading and writing emails but there are some moments that call for good old printed correspondence. There’s no denying the tactile feel of high-quality card trumps an email every time. Printed save the dates will give your guests a sense of occasion that just can’t be achieved with an email. Imagine your save the date popping into your friend’s inbox sandwiched between daily deal offers and company newsletters – hardly the most romantic of wedding announcements. Even worse, your email could get caught in a spam filter and your guests might wonder why they haven’t heard from you. Granted email save the dates save a lot of money and suit couples who regularly interact with their friends and family online. If going down the email route, it’s worthwhile asking professional graphic designer to create a template that will give your emails a little polish.
GET CREATIVE
It’s a myth that save the date cards cost the earth. There’s plenty of free online templates that you can download and customise to suit the style of your wedding. Enter your wedding theme or colour and ‘save the date templates’ into an online search engine and you’ll be amazed by the results. If you’re having a destination wedding DIY luggage tags can be a fun way to share your news and are easy to customise using pretty ribbon. Or if you’ve been together for years a photograph of your first date positioned alongside a recent picture can be an effective way of announcing your wedding plans.
It’s also worthwhile searching for save the date cards on YouTube. I knew I wanted a hand in designing our wedding stationery but was unsure about the best approach. A YouTube search introduced me to kirigami (the art of paper cutting) and now I’m hooked!
I followed the video instructions, tested the design and found that each card took around an hour to make. Yes, crafting your own stationery is a labour of love but what better occasion than a pending wedding to explore your creative side? Feeling inspired? Read on for my 10-step guide to making your very own pop-up save the date cards…
Pop art
With a bit of patience and some craft kit, you too can create an impressive save the date card. Let Ann show you how …
• Gather your materials. You’ll need thick card in two colours (I used A4 260gsm in linen white and 157mm square 220gsm in flamingo pink), a cutting board and craft knife, spray adhesive, gingham ribbon, a hole punch, an HB pencil and a fine tip black pen.
• Search You Tube for ‘wedding cake pop up card’ to find the wedding cake template. You’ll see the link to this particular design in the comments box on the right hand side of the video.
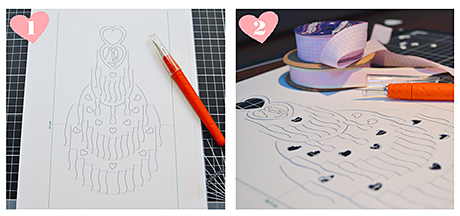
• Using a computer printer, print out the template onto a piece of white A4 card using standard black ink [see image 1].
• Cut along the solid bold lines of the pattern using your craft knife to form the cake shape. Once complete score gently along the dotted lines without piercing the card [see image 2].
• Once all the lines are cut or scored carefully fold the wedding cake outwards to form a 3D shape. Slowly bend all the folds you made with the craft knife to allow the wedding cake to stand on its own [see image 3].
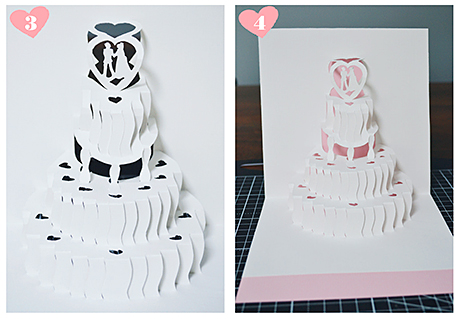
• Glue the wedding cake edges onto the coloured card using spray adhesive. This part can be sticky so cover any nearby surfaces when using the spray to avoid damage. Once secured use a ruler and the craft knife to trim away any excess card [see images 5 and 6].

• With an HB pencil finely sketch out the positioning of your wedding date. When you’re happy with the design steadily go over the pencil with a thin black pen in your best handwriting. Don’t forget to include your and your H2B’s full names, the wedding date and the venue [see image 7].
• Fold the card closed and with a pencil make two markers approximately 4cm from the edge of the card. Then use a crafter’s hole punch to make two circular holes through both sides of the card [see image 8].
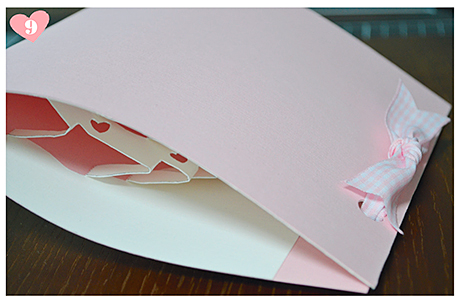
• Cut a 30 cm length of gingham ribbon and thread through the holes to keep the card closed then secure in a small decorative bow and cut the ends of the ribbon to avoid fraying [see image 9].
• To complete the look tuck the invitations into hand written envelopes and ask the postman to handle your precious cargo with care by writing ‘fragile’ on the envelope.